Make.com Credentials (for Add Connection)
This guide shows exactly how to find the Make.com credentials required by Flow Beacon’s “Add Connection” modal, plus a quick reference for common IDs you might see in advanced guides.
What you need for Add Connection
- API Token
- Team ID
- Organization ID
- Zone (region), for example
eu1.make.comorus1.make.com
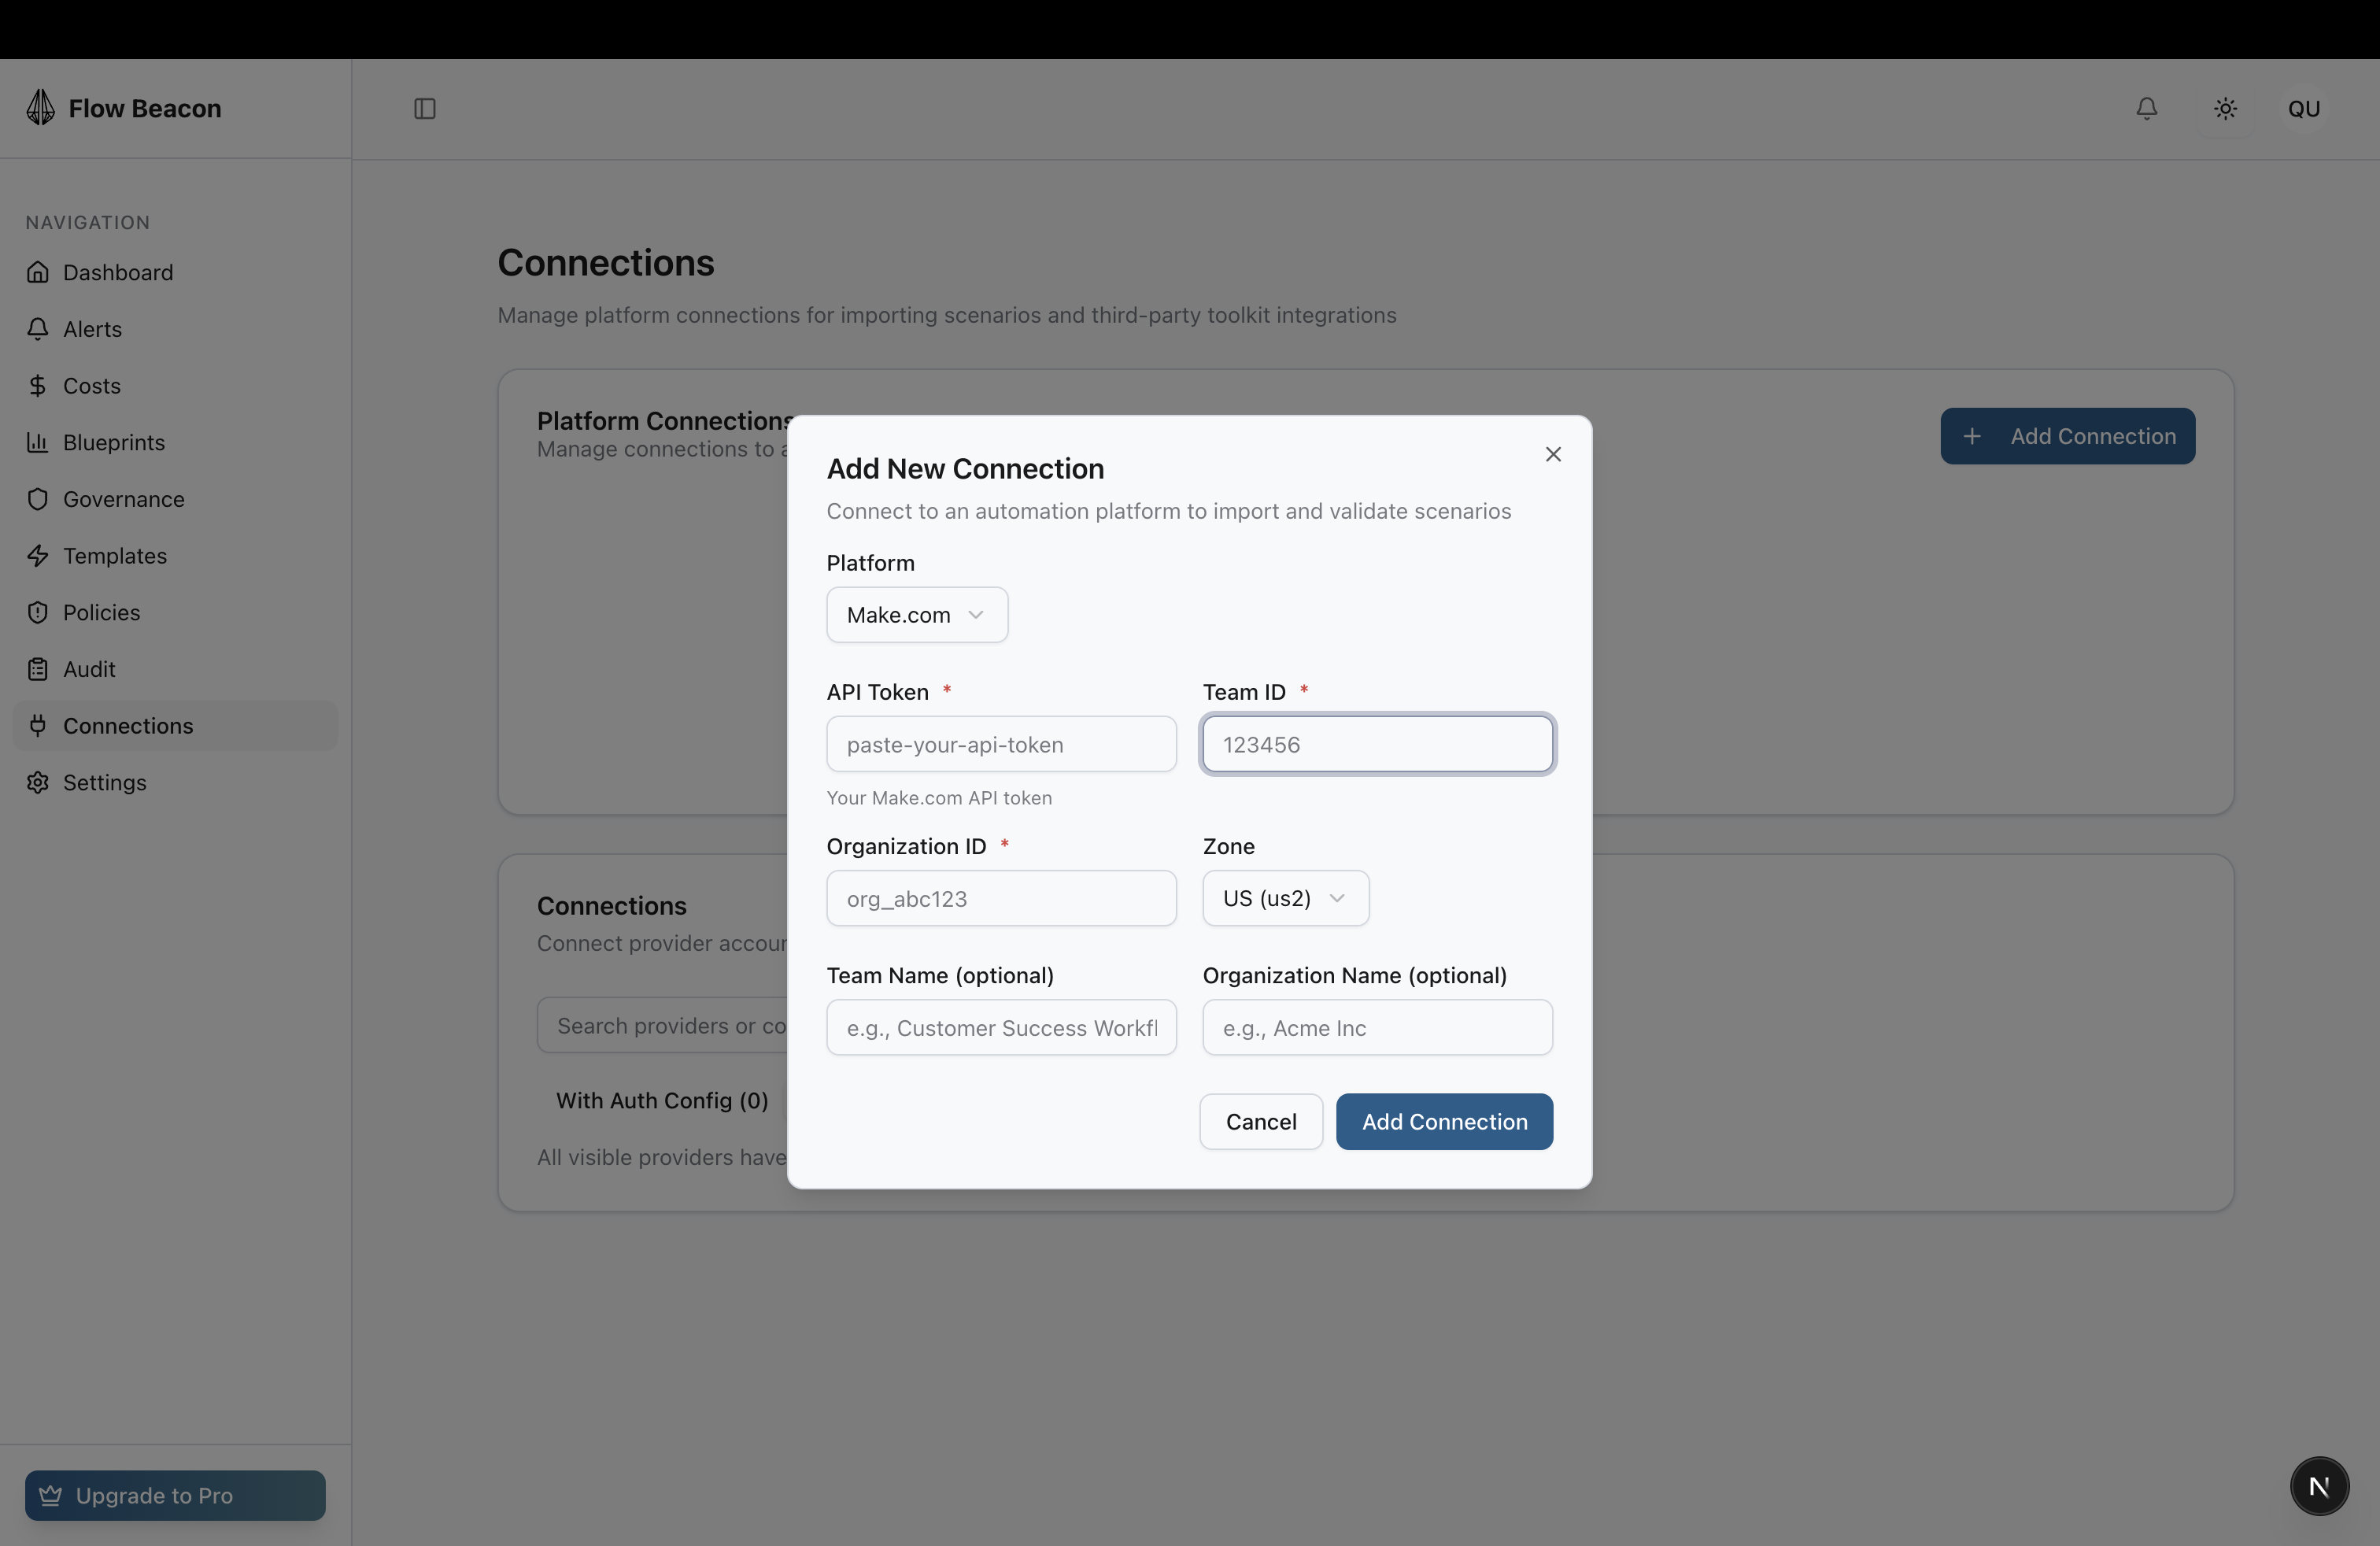
If you haven’t connected a platform before, start with the Quickstart to reach first value, then come back here for the Make.com values required by the Add Connection modal.
Contents
- API Token
- Team ID
- Organization ID
- Zone/Region
- Optional IDs (advanced)
- Troubleshooting
- Official References
1. API Token
The API token is your authentication key for accessing Make.com's API resources. It acts like a secure password for applications.
How to Generate Your API Token:
Step 1: Log in to your Make.com account
Step 2: Click on your avatar/profile icon at the bottom-left corner of the page
Step 3: Select "Profile" from the dropdown menu
Step 4: Open the "API" tab
Step 5: Click "Add token" button
Step 6: Configure your token:
- Label: Enter a descriptive name for your token (e.g., "Production API", "FlowBeacon Integration")
- Scopes: Select the permissions/scopes you need for your API operations
Step 7: Click "Save"
Step 8: IMPORTANT: Copy your token immediately and store it securely. Once you leave this page, parts of your token will be hidden for security reasons, and you won't be able to see or copy it again.
API Token Scopes:
API scopes control what operations your token can perform:
- Read scopes (
:read): Allow GET requests to retrieve data without modifications - Write scopes (
:write): Allow POST, PUT, PATCH, or DELETE requests to create, modify, or remove resources
Common scopes include:
scenarios:read/scenarios:writeconnections:read/connections:writeorganizations:read/organizations:writeteams:read/teams:writehooks:read/hooks:writedatastores:read/datastores:write
Security Best Practices:
- Never share your API token with anyone
- Store tokens securely (use environment variables or secure vaults)
- Create separate tokens for different applications or purposes
- If you have access to multiple Make zones, generate separate tokens for each zone
- Regularly review and revoke unused tokens
2. Team ID
The Team ID is a numeric identifier that represents your team within an organization.
How to Find Your Team ID:
Method 1: Via URL (Easiest)
Step 1: Log in to your Make.com account
Step 2: In the left sidebar, click on "Team"
Step 3: Look at the URL in your browser's address bar. It will look like:
https://us1.make.com/134/team/dashboard
Step 4: The number between make.com/ and /team/ is your Team ID
- In the example above, the Team ID is 134
Method 2: Via Scenarios Page
Step 1: Navigate to any page within your team (Scenarios, Connections, etc.)
Step 2: Check the URL structure:
https://eu1.make.com/456/scenarios
Step 3: The number after the zone URL (e.g., eu1.make.com/) is your Team ID
- In this example, the Team ID is 456
Method 3: Via API
You can retrieve team information using the Make API:
- Endpoint:
GET /api/v2/teams/{teamId} - List all teams:
GET /api/v2/organizations/{organizationId}/teams
3. Organization ID
The Organization ID represents the top-level container that holds all your teams, scenarios, users, and data.
How to Find Your Organization ID:
Method 1: Via URL (Easiest)
Step 1: Log in to your Make.com account
Step 2: Navigate to your organization dashboard by clicking "Org" in the left sidebar
Step 3: Look at the URL in your browser:
https://eu1.make.com/organization/789/dashboard
Step 4: The number after /organization/ is your Organization ID
- In this example, the Organization ID is 789
Method 2: Via Profile Settings
Step 1: Click your avatar at the bottom-left corner
Step 2: Select "Profile"
Step 3: Go to the "Organizations" tab
Step 4: Your organization details will be displayed, including the Organization ID
Method 3: Using Make Module (Mapping Panel)
Step 1: Create a scenario and add a Make module
Step 2: Open the mapping panel
Step 3: Search for "organization id"
Step 4: The organization ID will be available as a mappable variable
Important Notes:
- Each organization has its own separate billing and pricing plan
- Each organization can contain multiple teams
- You can be a member of multiple organizations
- The geographical data center location (US or EU) is set when creating an organization and cannot be changed later
4. Zone/Region
The Zone URL indicates the geographical location and environment of your Make.com organization's data center.
How to Find Your Zone URL:
Step 1: Log in to your Make.com account
Step 2: Look at the URL in your browser's address bar
Step 3: The zone URL is the base domain portion:
Common Zone URLs:
United States:
https://us1.make.com/https://us2.make.com/https://us1.make.celonis.com/(Enterprise)
European Union:
https://eu1.make.com/https://eu2.make.com/https://eu1.make.celonis.com/(Enterprise)
Other Regions:
https://local.make.cloud/(On-premise)
Zone URL Structure:
Your complete URL will look like:
https://{zone_url}/api/{api_version}/{api_endpoint}
Example:
https://eu1.make.com/api/v2/users/me
Why Zone URLs Matter:
- Zone URLs are tied to the infrastructure region (United States or Europe)
- Different zones may be associated with different pricing plans (Enterprise vs. Standard)
- Critical: You must use the correct base URL when making API calls, or your requests will fail
- If you have access to multiple zones, you need separate API tokens for each zone
Use this value in Flow Beacon’s Zone field. It’s the domain shown in your Make.com address bar, such as eu1.make.com or us1.make.com.
5. Optional IDs (advanced)
You don’t need the IDs below to connect Flow Beacon, but they’re useful in advanced workflows and API calls.
User ID
The User ID is your unique identifier within the Make.com platform.
How to Find Your User ID:
Method 1: Via Browser Developer Console
Step 1: Log in to your Make.com account
Step 2: Open your browser's Developer Console:
- Chrome/Edge: Press F12 or Ctrl+Shift+I (Windows) / Cmd+Option+I (Mac)
- Firefox: Press F12 or Ctrl+Shift+I (Windows) / Cmd+Option+I (Mac)
Step 3: Go to the "Network" tab in the Developer Console
Step 4: Navigate to your organization's Users page (Org → Org Users)
Step 5: Look at the network requests in the console. Filter by "users" or "me"
Step 6: Find your User ID in the request responses
Method 2: Via Make API
Step 1: Use the API endpoint with your authentication token:
GET https://{zone}.make.com/api/v2/users/me
Step 2: The response will include your user details, including your User ID
Step 3: You can use tools like Postman, cURL, or any HTTP client:
curl --location \
--request GET 'https://eu1.make.com/api/v2/users/me' \
--header 'Authorization: Token YOUR_API_TOKEN'
Scenario ID
The Scenario ID is the unique identifier for each automation scenario you create.
How to Find Your Scenario ID:
Method 1: Via Scenario URL
Step 1: Open your scenario in the editor
Step 2: Look at the URL in your browser:
https://us1.make.com/112/scenarios/925
Step 3: The number after /scenarios/ is your Scenario ID
- In this example, the Scenario ID is 925
Method 2: Via Scenarios List
Step 1: Go to your Scenarios page
Step 2: Enable Developer mode (if available) to see IDs directly in the interface
Step 3: Hover over or click on a scenario to see its ID
Method 3: Via Make API
List all scenarios:
GET /api/v2/scenarios?teamId={teamId}
Get specific scenario details:
GET /api/v2/scenarios/{scenarioId}
Method 4: Using Make Module
Step 1: Create a new scenario
Step 2: Add the Make → List Scenarios module
Step 3: Configure your connection, organization, and team
Step 4: Run the module to get a list of all scenario IDs
Scenario ID Use Cases:
- Reference scenarios in API calls
- Use in "Run a Scenario" modules
- Store in variables for dynamic scenario execution
- Track scenario performance and logs
- Automate scenario management (enable/disable, update settings)
Connection ID
Connection IDs identify the authenticated connections between Make.com and third-party services (like Google Drive, Slack, Airtable, etc.).
How to Find Your Connection ID:
Method 1: Via Connections Page
Step 1: In the left sidebar, click "Connections"
Step 2: Find the connection you need
Step 3: Click on the connection to view details
Step 4: The Connection ID may be visible in the URL or interface
https://eu1.make.com/128/connections/15
- In this example, the Connection ID is 15
Method 2: Via Make API
List all connections for a team:
GET /api/v2/connections?teamId={teamId}
Example response:
{
  "connections": [
    {
      "id": 2,
      "name": "My Airtable connection",
      "accountName": "airtable2",
      "teamId": 22,
      "organizationId": 3
    },
    {
      "id": 15,
      "name": "My Google connection",
      "accountName": "google",
      "teamId": 22,
      "organizationId": 2343
    }
  ]
}
Method 3: Via Scenario Module
Step 1: Create a scenario with the Make → List Connections module
Step 2: Configure the module with your Team ID
Step 3: Optionally filter by connection type (e.g., "google", "airtable2")
Step 4: Run the module to retrieve all connection IDs
Connection Details Include:
- ID: Unique numeric identifier
- Name: Custom name you assigned
- Account Name: Type of service (e.g., "google", "slack")
- Account Label: Display name of the service
- Team ID: Associated team
- Organization ID: Associated organization
- Scopes: Permissions granted to the connection
- Metadata: Additional connection information (email, username, etc.)
8. Additional Information
Folder ID
If you organize scenarios in folders:
Step 1: Navigate to your scenarios page
Step 2: Click on a folder
Step 3: Check the URL:
https://us1.make.com/134/scenarios?folder=567
- The Folder ID is 567
Webhook URL
For webhook modules:
Step 1: Add a Webhooks → Custom Webhook module to your scenario
Step 2: Click "Add" to create a new webhook
Step 3: Copy the generated webhook URL
Step 4: This URL is unique and used to receive data from external services
Data Store ID
For data storage:
Step 1: Navigate to Data Stores in the left sidebar
Step 2: Select your data store
Step 3: The Data Store ID appears in the URL or interface
Alternatively, use the API:
GET /api/v2/data-stores?teamId={teamId}
Time Zone Settings
Your timezone affects scheduled scenario executions:
Organization-Level Timezone:
- Set when creating your organization
- Used for all technical operations and scheduling
- Found in: Profile → Organizations → [Your Org]
User-Level Timezone:
- Personal preference for viewing times
- Doesn't affect technical operations
- Found in: Profile → Timezone
API Usage Examples
Example 1: List Scenarios Using cURL
curl --location \
  --request GET 'https://eu1.make.com/api/v2/scenarios?teamId=134' \
  --header 'Content-Type: application/json' \
  --header 'Authorization: Token YOUR_API_TOKEN'
Example 2: Get Team Details
curl --location \
  --request GET 'https://us1.make.com/api/v2/teams/134' \
  --header 'Authorization: Token YOUR_API_TOKEN'
Example 3: List Connections
curl --location \
  --request GET 'https://eu1.make.com/api/v2/connections?teamId=134' \
  --header 'Authorization: Token YOUR_API_TOKEN'
Quick Reference Table
| Credential | Location | Format | Example |
|---|---|---|---|
| API Token | Profile → API tab | UUID string | 93dc8837-2911-4711-a766-59c1167a974d |
| Team ID | Team page URL | Number | 134 |
| Organization ID | Org page URL | Number | 789 |
| Zone URL | Browser address bar | URL domain | https://eu1.make.com/ |
| User ID | API /users/me | Number | 985 |
| Scenario ID | Scenario URL | Number | 925 |
| Connection ID | Connections page URL | Number | 15 |
Troubleshooting
"Access Denied" Error (403)
- Check that your API token has the required scopes
- Verify you're using the correct authentication header
- Ensure you have permission to access the resource
"Not Found" Error (404)
- Verify the ID is correct (Team ID, Scenario ID, etc.)
- Check that you're using the correct zone URL
- Ensure the resource exists and hasn't been deleted
Token Not Working
- Confirm you copied the entire token correctly
- Check that the token hasn't been revoked
- Verify you're using the token for the correct zone
- Ensure the token has not expired (if applicable)
Wrong Zone URL
- Your API calls must match your account's zone
- Check your browser URL to confirm your zone
- Use
https://eu1.make.com/for EU accounts - Use
https://us1.make.com/for US accounts
Official References
Document Version
Version: 1.0
Last Updated: October 29, 2025
Maintained by: FlowBeacon Team
Need Help? If you encounter any issues finding these credentials, contact your Make.com administrator or reach out to Make.com support.